Making the Colour Model
- Jan 12, 2018
- 6 min read
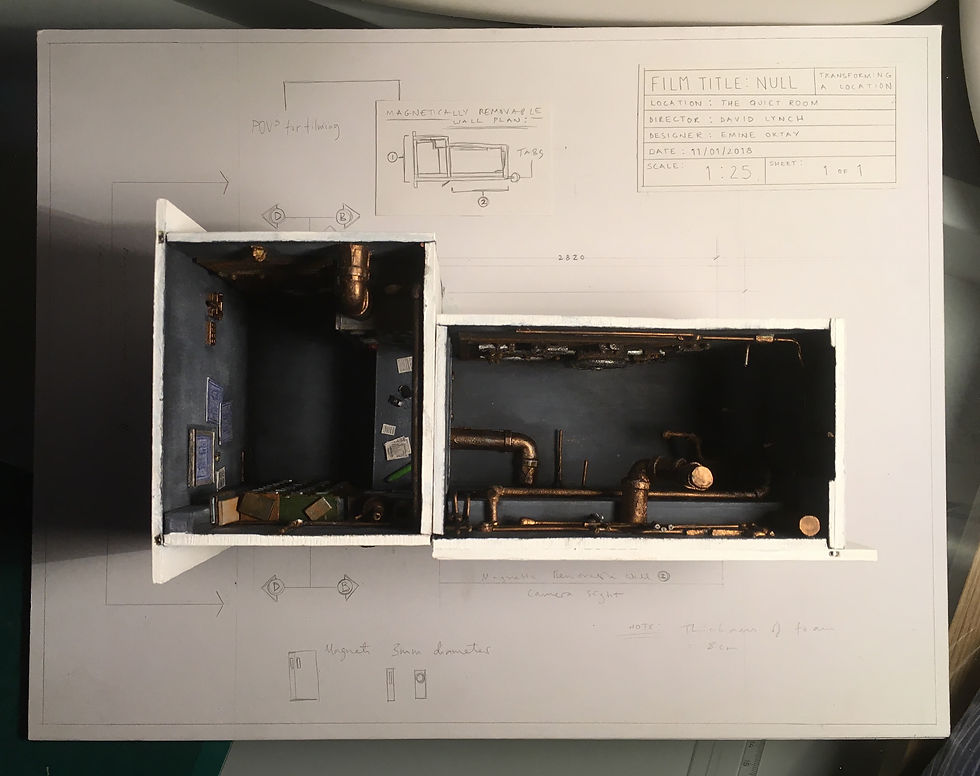
Surrounded by materials, tools, books and all of my design sketches, I was ready to begin the colour model. Having already made the white card model, I'd familiarised myself with the logistics of creating the technical drawing in the 3rd dimension and was able to visualise my design within the actual space.
It was at this point that I realised the inclusion of the colonnade ceiling was slightly redundant in terms of creating the correct lighting when it came to filming the model. So, unfortunately, I had to get rid of this feature and focus on creating a very stark, cold looking room to keep this feeling of brutalism. Using desaturated colours, overwhelmingly bolted doors and an abundance of metal and concrete - I definitely feel I can still achieve the same effect I'd gathered from the Nazi Stripped Classicism research.

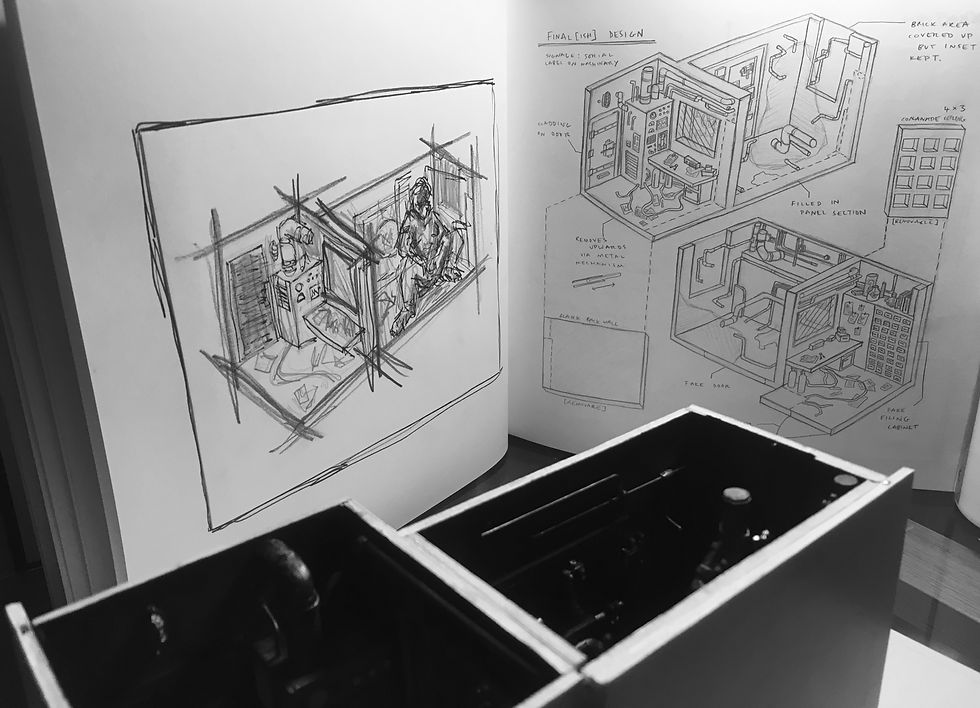
Above: A recap on the pencilled design. Not in the correct dimensions, but a helpful guide.
Although the outcome of this project is the model, the reality of creating the set within my chosen room would require quite a few adjustments before work could begin. The main change being the panel section which originally has a cut out area and indents between each panel. These features would have to be hidden by a long rectangular piece of wood. Another feature I decided not to keep was the brickwork detailing at the back of the room; it didn't fit in with the brutalist style I'm hoping to achieve. This too can be eliminated by a thin sheet of wood - making sure the inset is still visible. Lastly, a concrete room would not have skirting boards, so panels would have to be put up around the necessary walls to disguise these. Other changes to the room include the fake wall in the middle, a faux filing cabinet on the panel section and, finally, hiding the sink cabinet with the large piece of machinery.
Of course, with the model I can make shortcuts to the final outcome [without having to build the model and then add the adjustments]. Below I have included two diagrams to visualise everything written above.


The process of actually making the model required little-to-no referencing in terms of technique. Everything I made just used 4 main materials [mount-board, card, milliput & wire/tubing] and it all came from simple problem solving. This first half of the project was achieved solely through the use of my technical drawing, mood-board and set-design plan.
When it came to panting however, this required a bit more guidance including the use of mood-boards, colour schemes, film references [and a bit of help from my boyfriend]. I rarely paint and when I do its just in 3 flat colours, so I was really nervous approaching realism painting.
Below I've made a quick overview of the process with images taken along the way.
The Modelling Process in 10 Stages:
1. The Basic Structure
This first stage involved creating all of the main walls and features - this required a little bit of recalculation to accommodate the thickness of the foam-board. It was a little bit tricky to cut the foam-board to begin with but I soon got the hang of it. In order to visualise the final outcome a bit better, I composed all the pieces together to create the 3D form. It was at this point I realised how obstructing the fake wall was, so decided to increase the size of the viewing window.


2. The Main Features Within
I begun with the filing cabinet as a quick warmup for this part. A simple collection of rectangular cut outs of card and mountboard [and an understanding for creating components in the correct scale].
It was from here that I moved on to the real door and then the fake one. I really enjoyed creating these, Working from my design, I was able to create the smallest and most intricate model I'd ever made. These two were really successful.
I then went on to the piece of machinery - the gap seen in the picture were to be filled once the components were painted and assembled.


It's important to note that it was at this point I decided to create a 2nd removable door. The clarity from the original POV was very poor; the detailing of the large door for example was completely lost. This involved splitting elevation C-C at the point of the dividing wall. I also made the addition of a tab and a small pull to allow this wall to come off with ease.
[Below is a brief diagram of the logistics for this element].

3. Props to Dress The Set
A collection of books, glass jars, oxygen tanks and wall fittings all made with card and milliput. The few cylinders and oblongs in the bottom left-hand corner are actually parts taken from an old motherboard - a quick shortcut for the set dressing.


4. The Pipework
In order to produce the pipework in the correct scale, I made some very rough sketches using the original technical drawing and went from there.
I was able to create all of the pipes using a combination of plastic-coated spring steel, brass tubing, thin plastic sheets [0.25mm-0.5mm], milliput and card. This was definitely the most challenging part of the model-making process and took just over a day to complete.


5. Paint Tests & Priming
After attempting to paint the plastic coated spring steel [and the paint simply bunching up and not attaching to the surface], I decided to add a base coat to all of the pipework - something I've done before when painting Warhammer figures. It was also at this stage I put together a few samples using the paints I'd recently bought. The selection shown were plans for the pipework, walls, doors and machinery. More of these were made at a later stage.


6. Painting the Model
Everything shown below was achieved with a combination of acrylics, citadel paints and metallic ‘Warpaints’. There were vague uses of external resources for help [mostly visual], but the vast majority were achieved simply through problem-solving and experimentation.
Unfortunately I wasn't able to create the test jars with the small emrbyos within; this was due to poor planning and the wrong use of materials. The solution was to turn one into a spare green strip for the machine, another into a bottle containing the same liquid and the other, a metal jar.


It was at this stage that I decided on a prop design that would later be scaled-up as a part of Unit 3. Below are a few images to show the 1:25 version accompanied by a few other additions [including a power switch & control panel] to accompany it on the back wall.


[I've made a separate blog post with the thought process behind this and a plan for scaling it up].
With everything painted, I was able to create small clusters in preparation for the final assembly. As you can see below, this required a bit of mental planning to make sure everything came together easily.
7. Creating Clusters of the Model
Joining props to the flat walls and then joining walls together to ease the final assembly.


8. Final Touches
Unfortunately I didn't take enough photos for this stage, but in general it involved creating paper details [including notes on the wall, paperwork & dials on the machinery], dry-brushing props & appling more layers of dark tone to the corners of the room and around elements [such as doors, machinery & pipework]. In the end I decided to get rid of the cabling design; I tested it with the wires I'd purchased but it just looked quite cheap and ruined the scale of the design also.


9. Assembling The Structure
Creating the window for the dividing wall and assembling all of the stationary walls.


10. Creating the Mechanism for the Removable Walls
I purchased a box of magnets [3mm diameter] and carried out some tests with them before attaching them to the required walls. Luckily, I found a method of hiding the magnets and avoiding gaps between walls when joined. I joined up 8 pairs of the magnets and painted the outer sides to mark that they should face away from the joining [to avoid opposite attractions]. Then, by making small incisions in the foamboards I simply superglude them in. This worked very successfuly, better than I thought it would!


The Final Outcome


To summarise, I was really surprised by the outcome. Before starting, I pictured my model looking extremely amateur with cheap paintwork and an inaccuracy with scale. The final thing, however, is quite different. Thanks to all of the preliminary planning, sketches and measurements I was able to piece everything together perfectly. Even though I was extremely nervous to paint, I think I've done a pretty decent job [with dry brushing being my main technique].
Near enough everything I created/painted were acheived through my own problem solving; I was expecting to need a lot of help along the way but it all figured itself out somehow. I think perhaps the concrete effect could be better and more textures would've been a bonus [e.g. the leakage], but I was just worried that I'd end up ruining the model with things that weren't crucial to the design.
Overall, for a first time model maker, I'm very proud of how it's turned out.


![Storyboard [Version 2 - Final]](https://static.wixstatic.com/media/6101d6_ca4da145888648f9ad4b241803e2a8b0~mv2_d_2048_1442_s_2.jpg/v1/fill/w_1407,h_1000,fp_0.50_0.50,q_30,blur_30,enc_avif,quality_auto/6101d6_ca4da145888648f9ad4b241803e2a8b0~mv2_d_2048_1442_s_2.jpg)
![Storyboard [Version 2 - Final]](https://static.wixstatic.com/media/6101d6_ca4da145888648f9ad4b241803e2a8b0~mv2_d_2048_1442_s_2.jpg/v1/fill/w_152,h_108,fp_0.50_0.50,q_90,enc_avif,quality_auto/6101d6_ca4da145888648f9ad4b241803e2a8b0~mv2_d_2048_1442_s_2.jpg)
![The Dark Crystal: Age of Resistance [Making Of]](https://static.wixstatic.com/media/6101d6_fd1a13acacf546e5ba5c173f142545b9~mv2.jpeg/v1/fill/w_905,h_500,fp_0.50_0.50,q_30,blur_30,enc_avif,quality_auto/6101d6_fd1a13acacf546e5ba5c173f142545b9~mv2.jpeg)
![The Dark Crystal: Age of Resistance [Making Of]](https://static.wixstatic.com/media/6101d6_fd1a13acacf546e5ba5c173f142545b9~mv2.jpeg/v1/fill/w_152,h_84,fp_0.50_0.50,q_90,enc_avif,quality_auto/6101d6_fd1a13acacf546e5ba5c173f142545b9~mv2.jpeg)
![Storyboard [Version 1]](https://static.wixstatic.com/media/6101d6_62e4bc4ad7a44be6990e8df33ca738e6~mv2_d_3508_2480_s_4_2.jpg/v1/fill/w_1407,h_1000,fp_0.50_0.50,q_30,blur_30,enc_avif,quality_auto/6101d6_62e4bc4ad7a44be6990e8df33ca738e6~mv2_d_3508_2480_s_4_2.jpg)
![Storyboard [Version 1]](https://static.wixstatic.com/media/6101d6_62e4bc4ad7a44be6990e8df33ca738e6~mv2_d_3508_2480_s_4_2.jpg/v1/fill/w_152,h_108,fp_0.50_0.50,q_90,enc_avif,quality_auto/6101d6_62e4bc4ad7a44be6990e8df33ca738e6~mv2_d_3508_2480_s_4_2.jpg)


Comments